|
Part 38 - Automated Watermarking
|
|
September 2007 Magazine
|
|
Last month’s article described in detail in the printed magazine how to prepare and apply a watermark. This month’s article explains how to simplify the process of applying the watermark on a PC by setting it up to make the changes with a single set of mouse clicks. For space reasons the fine details of this process could not be covered in the printed magazine so a full set of instructions is included here.
Free software called Imagemagick is used to make the changes in conjunction with, on a Windows PC, a batch file. You can download the Windows version used throughout this article from here (Beware that this file is over 7 MBytes in size and may take some time to download). Newer versions may be available from the Imagemagick web site but if you use one of these, be sure to update the batch file to match. Versions for Macintosh and Linux are also available.
The “Send To” menu in Windows is used for the watermarking operation. When you select any file in Windows Explorer and press the right mouse button - also known as “right clicking” - the “Send To” menu pops up and presents you with some options as shown in the screen shot below.
|
|

|
|
In this option a batch file called “add-logo-rhs.bat” will be run - note its blue highlighting. Setting up options on the “Send To” menu is as simple as putting a file or shortcut in the special “Send To” folder. On Windows XP the name of the special folder is C:\Documents and Settings\xxx\SendTo On Windows Vista the special folder is: C:\users\xxx\Microsoft\Windows\SendTo In both cases ‘xxx’ is the username you use when you log on to your computer. A screenshot from the author’s Windows XP PC where the logon name is “Kim” is shown below. The full path of the folder is displayed in the “Address” box.
|
|

|
|
Note that to be able to locate the folder and display its contents you will need to ensure that the Options in Windows Explorer are set to display Hidden Files and folders. Setting this option is shown below, ringed in red.
|
|

|
|
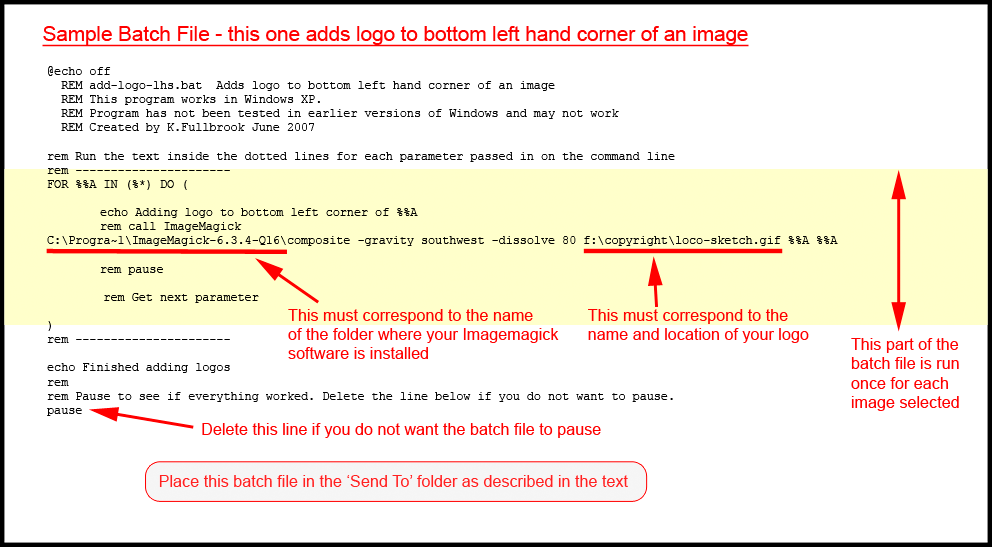
The author has provided four different batch files so that you can download them and use or experiment as you wish. **IMPORTANT** - Before you use them you **MUST** edit them to change the name of the logo file and its folder. If you don’t do this the batch file will fail with an error message something like “file not found”. In all cases the Imagemagick software is installed in a particular folder: C:\Program Files\ImageMagick-6.3.4-Q16 If you use the version of Imagemagick from this web site it will create a folder with with this name and work correctly. If you download directly from the Imagemagick web site the folder will have a different name and the batch file will not run properly. To display one of the batch files with more information on how it works click here. The batch files supplied are described in the table below. You can download some of the logos to your own PC as you wish, either in Gif file format or Photoshop’s own .PSD format..
|
|
|
|
Modification
You can change the “see through” value of the loco. Currently it is set to 80% in the batch file using the “-dissolve 80” setting. To make it less see through, increase it to 90 or 100, or remove the command. To make it more see through change the 80 value to something smaller.
|
|
Testing
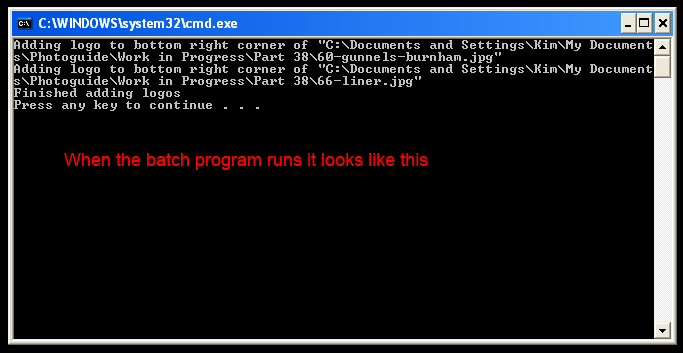
You should always test the programs before ruining a master image. Take a copy of an image that you don’t mind being ruined. Be sure its resolution matches the resolution of your logo - a setting of 72ppi is recommended. When you run your batch file a successful run should look like this. A “Pause” statement has been included in the batch file so that it stops after running the Imagemagick software - this allows you to see any error messages
|
|
Summary
A summary of the instructions is as follows:
- Download the Imagemagick software from this web site (here) and install it
- Download the batch file from the table above depending on where you wish to place the logo or label.
- Edit is using Windows Notepad so that the name and location of the batch file or label match the information in the batch file.
- Copy the batch file to the “Send To” folder on your PC
- Take a test image and run the batch file by using the “right click” menu
The above instructions can be daunting and it is easy to make a mistake. If you get stuck you can contact the author.
|
|
Part Thirty Seven
|
Part Thirty Nine
|


